There are lots of ways to transfer an image from one surface to another. I use the acrylic gel transfer process to take ballpoint pen drawings and turn them into images that are waterproof and lightfast. The process I've described below can be used with photocopies, laser prints, and magazine pictures. It doesn't work so well with inkjet prints, unless you count on the ink bleeding.
I recommend Golden Extra Heavy Gel (I like matte finish). You can use any kind of acrylic medium you like, but the thicker the gel, the sturdier and more complete your transfer will be. (Using thinner gel, or less of it, may give you a weathered kind of patina, but you'll lose some of your image.)
1. Take your laser print, photocopy, or otherwise printed image. Apply a generous coat of acrylic gel to the image. It doesn't matter how much of the paper you cover, as long as you cover every part of the image you wish to transfer. You don't even need to thin the gel with water; in fact, water will hinder the process by diluting the gel and slowing your drying time.
Note: Your transfer will be a mirror image of your original. Plan for this by flipping the image in PhotoShop before you make a laser print. Also, most photocopy machines come with a mirror image feature built-in. Ask your friendly underpaid copy shop assistant for guidance.
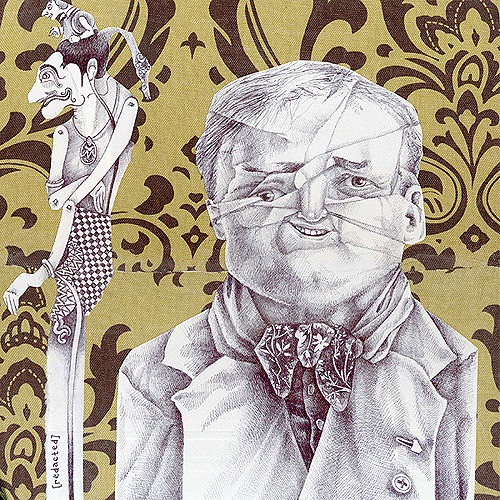
Normal, OK: Tishomingo "Mingo" Yale
This is my original drawing of Mingo Yale, ballpoint pen on paper.
2. Let it dry completely, then repeat. I usually apply three solid coats of gel. Again, experiment with this process to achieve your desired effects.
2a. After your coats of gel are dry, but before you make the transfer, you can cut away the unused paper, or even parts of your image. It may be helpful to leave extra paper to hold onto, especially if you're unused to this process. Keep in mind that the gel is bonding to the copier toner, so every little speck on your laser print or photocopy will transfer if it gets gel on it. This is your chance to control that.
2b. You can also apply acrylic paint during this process, for color. Your transferred image will be translucent, so color will show through. If you do this, remember to think like a glass painter or cel animator -- in backwards layers. The same effect applies to your choice of transfer material. If you transfer onto white paper, the white will show through (or emphasize your colored acrylic layers). If you transfer on to a colored or patterned surface, that will show through, and may add to or interfere with your transferred image.
3. When your third coat of gel is dry, have your panel ready to transfer onto. Apply one more coat of gel to the image. While the gel is still wet, place the image face down on your panel. (You may want to make tic marks ahead of time, to register your corners.)
4. Using your hand, or other burnishing tool, rub the back of your paper firmly to glue the layers together. The tighter the seal, the more complete the image transfer will be. This works best on a rigid surface, not so well on traditionally stretched canvas. It is VERY IMPORTANT not to get any acrylic gel on the BACK of the paper. The paper must remain porous so water will penetrate it.
5. Let this dry completely, at least a couple of hours. Overnight is best. Press the layers together with books or heavy objects if possible.
6. When the sandwich is completely-I-really-mean-it-dry, sprinkle or spray the back of the paper with water. You just need enough to get the paper good and wet. Too much water will make a mess and make it more difficult to remove the paper. Using your fingers, or a sponge, or damp paper towel, rub the paper until it comes loose. Continue until all the little white fibery bits have come away. This is when you'll find out if you applied enough gel, or too much or too little.
7. Voila! What you see now is, from top to bottom: Laser toner or copier toner, layers of acrylic gel and/or acrylic paint, then your panel. The top layer of toner is pretty solid, but you can always paint more on top of it or at least seal it with another layer of gel.

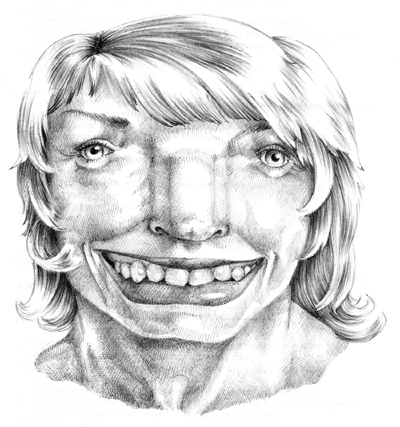
Normal, OK: Mingo Yale (in progress)
This is the post-transfer version. I began with a panel, gessoed it and painted it yellow. Before transferring, I cut around the image to avoid extraneous material transferring. Since making this particular transfer, I've noticed that I can trim right up to the edges of the image, and therefore control the physicality of my edge, eliminating any "halo" created by the thick acrylic gel. In this piece, I've downplayed the halo by painting around the transferred image with pink.
This process has opened up so many possibilities. Here are some other ideas:
Digitally altering scanned images, then printing and transferring
Turning digitally-created images into physical pieces
Making multiples, using different colors and materials
Transferring onto nontraditional surfaces (anything that acrylic will stick to)
Transferring different images onto a single surface, combining them
Of course there are unlimited directions in which this process could take you. Let me know how it works for you!